

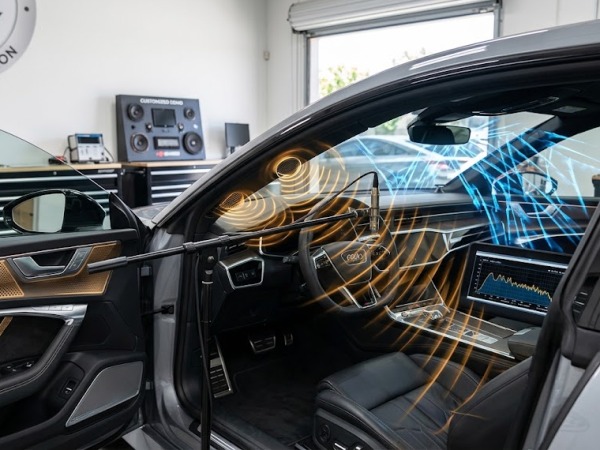
Achieving clean, high-fidelity sound inside a vehicle is one of the most challenging tasks in acoustic engineering. Unlike a dedicated home listening room or recording studio—where dimensions can be calculated to minimize standing waves and walls can be treated with balanced absorption—a vehicle interior presents an inherently hostile environment for sound reproduction.
Car audio enthusiasts often install upgraded speakers, subwoofers, and amplifiers, only to find the resulting audio sounds harsh, muddy, or lacking in bass definition once the car is in motion. The primary causes of this gap between hardware capability and real-world performance are cabin reflection and road noise.
Understanding how acoustic physics operates inside a automobile cabin allows you to systematically address interference, preserve musical detail, and build a soundstage that remains stable at any speed.
Key Takeaways
| Core Insight | Practical Impact |
|---|---|
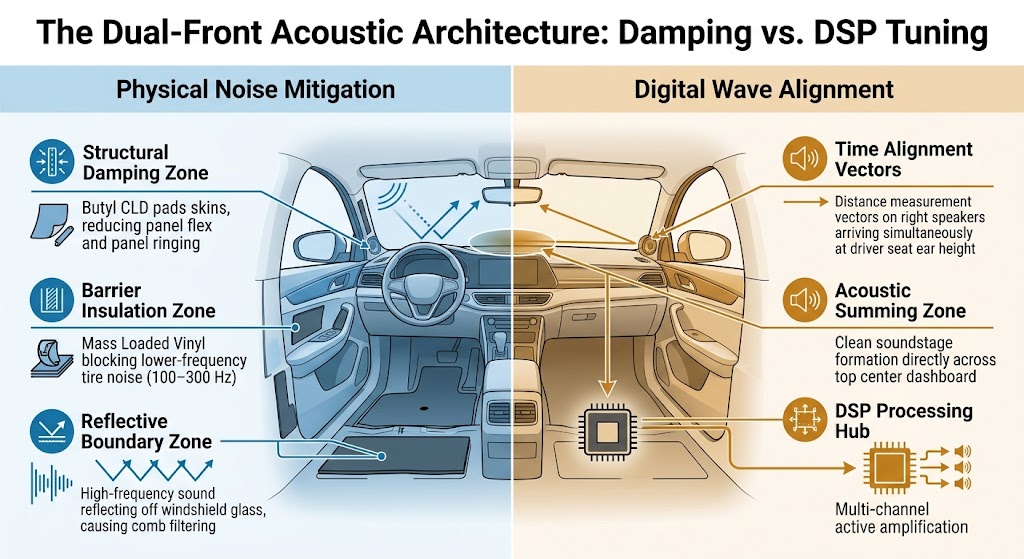
| Road noise centers between 100 Hz and 300 Hz | Tire rumble and pavement vibration mask low-midrange frequencies, obscuring vocals and mid-bass unless controlled with acoustic barriers. |
| Glass and hard surfaces cause comb filtering | High-frequency reflections interfere with direct speaker sound, creating artificial peaks and phase cancellations that distort imaging. |
| Speaker placement in cars is naturally asymmetrical | The driver sits significantly closer to the left speaker than the right, making Digital Signal Processor (DSP) time alignment essential. |
| Hardware alone cannot overcome acoustic physics | Premium speakers will perform poorly without physical dampening and digital calibration designed for cabin acoustics. |
What Makes a Vehicle Interior Acoustically Hostile?
Automotive interior design prioritizes driver safety, passenger comfort, visibility, and aerodynamics. Audio performance is rarely the primary consideration in vehicle architecture. As a result, standard car cabins introduce two main acoustic barriers to high-quality sound: structural reflection and external noise contamination.
[ Side Window (Hard / Reflective Surface) ]
                         /
                        /  Reflected Sound Wave
                       /
[ Left Speaker ] ----> X ---------------------> [ Driver's Ear ]
       \                                              ^
        \-------------------------------------------/
                    Direct Sound Wave
The Mechanics of Cabin Reflections and Standing Waves
Sound waves propagate from speaker cones and reflect off nearby surfaces. In a car, sound encounters a dense mix of materials with contrasting reflective properties:
- Hard, highly reflective surfaces: Windshields, side windows, plastic dashboards, and door trim.
- Absorptive surfaces: Carpeting, foam headliners, and leather or cloth seating.
When high-frequency sound waves hit untreated automotive glass, they bounce off almost instantly, reaching the listener’s ears milliseconds after the direct sound from the speaker cone. This delay creates comb filtering, where specific frequencies cancel out while others constructively amplify. To the listener, comb filtering manifests as a harsh, bright tone in the upper-midrange (2 kHz – 5 kHz) and an unstable soundstage where instruments shift positions across the dashboard.
In the lower frequency spectrum, long sound waves interact with the small boundaries of the cabin to create standing waves and cabin gain. Cabin gain acts as a natural boost to deep sub-bass frequencies (below 60 Hz), but mid-bass frequencies (60 Hz – 250 Hz) often experience severe cancellation, leaving kick drums sounding thin or boomy rather than tight and articulate.
Acoustic Masking: How Road Noise Destroys Audio Detail
The second major obstacle to automotive sound quality is background noise, officially referred to as the vehicle’s noise floor. When a vehicle is driven at highway speeds, external noise sources generate ambient energy:
- Tire and Pavement Interaction: Concentrated heavily in the 100 Hz – 300 Hz range.
- Wind Turbulence: Spans the 200 Hz – 800 Hz range around A-pillars and mirrors.
- Mechanical and Exhaust Rumble: Dominates low frequencies below 100 Hz.
When ambient road noise occupies the same frequency bands as fundamental musical elements (such as male vocals, bass guitars, and snare drums), acoustic masking occurs. The human brain cannot distinguish the lower-volume musical details beneath the louder road noise floor. Simply turning up the volume fails to solve this issue; increasing power across an uncalibrated system introduces amplifier clipping, thermal compression, and listener fatigue.
Treating the Vehicle Environment: Sound Deadening and Damping
Before addressing electrical tuning or DSP adjustments, the mechanical foundation of the cabin must be stabilized. Proper vehicle sound treatment relies on three distinct material categories:
- Constrained Layer Dampers (CLD): Butyl rubber sheets backed with thick aluminum constraint layers. CLD converts structural resonance and panel vibration into low-level thermal energy. Applying CLD to large metal surfaces (doors, floor pans, trunk lids) stops sheet metal from acting as a secondary speaker cone.
- Decouplers and Open-Cell Foams: Materials designed to absorb airborne reflections behind speaker drivers and isolate trim panels from rubbing against sheet metal, preventing buzzes and rattles.
- Mass Loaded Vinyl (MLV) Noise Barriers: Dense, limp-mass barriers placed over floorboards and wheel arches to physically block exterior road noise from penetrating the cabin.
+-------------------------------------------------------------+
| OUTER DOOR SKIN                                             |
+-------------------------------------------------------------+
                              |
[ Constrained Layer Damper (CLD) ] -> Damps Vibration
                              |
                       AIR GAP / CAVITY
                              |
[ Closed-Cell Foam Decouling Layer ] -> Prevents Rattles
                              |
[ Mass Loaded Vinyl (MLV) ] -> Blocks Road Noise
                              |
+-------------------------------------------------------------+
| INNER DOOR PANEL                                            |
+-------------------------------------------------------------+
Sound Treatment Execution Checklist
Applying sound treatment requires a targeted approach. Focus application on the areas that generate the highest acoustic benefit rather than covering 100% of every surface blindly.
- [ ] Outer Door Skins: Apply 30% to 50% coverage of high-mass CLD material directly to the center of flat metal panels to damp structural ringing.
- [ ] Inner Door Cavity Sealing: Seal all large service holes in the inner door metal using solid backing plates covered with CLD. Sealing turns the interior door volume into a rigid, enclosure-like acoustic space for the mid-bass driver.
- [ ] Acoustic Absorption Behind Speakers: Install hydrophobic silicone or closed-cell acoustic foam directly behind the main door speakers on the outer skin to prevent rear wave energy from bouncing back through the speaker cone.
- [ ] Door Panel Decoupling: Apply synthetic acoustic felt or open-cell foam between the plastic interior door card and the inner metal frame to prevent high-frequency plastic friction rattles.
- [ ] Floor Pan and Wheel Arches: Lay a continuous layer of closed-cell foam topped with 1 lb/sq.ft Mass Loaded Vinyl over the floorboard and rear wheel wells to block low-frequency road noise.
For a deeper dive into material selection, explore our guide on sound deadening materials and application techniques.
Digital Signal Processing (DSP): The Engineering Solution for Cabin Acoustics
Once physical noise floor reduction and structural resonance damping are complete, digital correction resolves the remaining acoustic errors inherent to car cabin geometry. A modern Digital Signal Processor (DSP) sits between the source unit and the amplifiers, offering precise control over signal timing, crossover points, and frequency response.
+---------------+     +--------------------+     +------------------+     +-------------------+
| Head Unit /   | --> | Digital Signal     | --> | Multi-Channel    | --> | Individual        |
| Source        |     | Processor (DSP)    |     | Amplifiers       |     | Speakers          |
+---------------+     +--------------------+     +------------------+     +-------------------+
                       - Time Alignment           - Discrete Power           - Active Crossovers
                       - Parametric EQ            - Clean Gain               - Targeted Bands
                       - Phase Control
Fixing Time Alignment and Phase Distortion
In a home listening environment, speakers are positioned equidistant from the listener to form an equilateral triangle. In an automobile, the driver sits inches away from the left door speaker and several feet away from the right door speaker.
Because sound travels through air at approximately 1,125 feet per second (343 meters per second), waves from the left channel reach the driver’s ears milliseconds before waves from the right channel. This delay destroys spatial imaging, pulling the singer’s vocal position directly into the nearest door speaker.
DSP time alignment delays the signal going to the nearest speakers by precise fractions of a millisecond. By delaying the left-side output, the sound waves from all speakers arrive at the driver’s ears simultaneously. The result is a coherent, realistic soundstage centered directly across the dashboard.
Step-by-Step DSP Acoustic Calibration Process
Professional car audio tuners use calibrated measurement microphones and real-time analyzers (RTA) to correct cabin aberrations. The standard calibration workflow follows a strict sequence:
[1. Baseline Checks & Polarity]
               │
               ▼
[2. Active Crossover Configuration]
               │
               ▼
[3. Channel-by-Channel Level Matching]
               │
               ▼
[4. Precision Impulse Time Alignment]
               │
               ▼
[5. Per-Channel Parametric EQ Correction]
               │
               ▼
[6. Phase Summing & Target Curve Finalization]
- Verify Electrical Polarity: Ensure every individual driver is wired in correct electrical phase prior to taking measurements.
- Set Active Crossovers: Assign high-pass and low-pass filter slopes to protect drivers and restrict each speaker to its linear operating bandwidth.
- Channel-by-Channel Level Matching: Gain-match individual speaker channels to balance output levels across the listening position.
- Apply Time Delay: Measure physical acoustic distances from each speaker dust cap to the driver’s head position, entering offset values into the DSP software.
- Parametric Equalization (EQ): Measure each speaker individually using pink noise. Apply narrow parametric EQ cuts to pull down resonant spikes caused by cabin reflections, leaving natural musical frequencies intact.
- Final Target Curve Alignment: Sum all channels and adjust broad system tonality against an established acoustic target curve (such as the JBL/Harman curve or ResoNix house curve) to maintain balanced bass response when road noise is introduced.
To learn more about advanced tuning parameters, read our complete breakdown on DSP car audio tuning principles.
Speaker Placement and Acoustic Angle Optimization
Physical location and aiming angles heavily influence how speaker energy interacts with interior glass and upholstery. Understanding off-axis response helps minimize unwanted reflection before it happens:
+--------------------+-------------------------------------------+--------------------------------------------+
| Speaker Type       | Ideal Cabin Mounting Locations            | Acoustic Rationale                         |
+--------------------+-------------------------------------------+--------------------------------------------+
| Tweeters           | A-Pillars or Sail Panels (Aim-optimized)  | Keeps high-frequency reflections off glass |
| (1 kHz - 20 kHz)   |                                           | and maintains high-frequency detail.       |
+--------------------+-------------------------------------------+--------------------------------------------+
| Midrange Drivers   | Dash Top (Reflected) or Custom A-Pillars  | Elevates vocal presence and stage height   |
| (250 Hz - 4 kHz)   | (Direct On-Axis)                          | toward eye level across the dashboard.     |
+--------------------+-------------------------------------------+--------------------------------------------+
| Mid-Bass Drivers   | Damped Lower Door Cavities                | Uses door panel rigidity to maximize       |
| (60 Hz - 250 Hz)   |                                           | lower-midrange punch and tactile impact.   |
+--------------------+-------------------------------------------+--------------------------------------------+
| Subwoofers         | Trunk / Cargo Area (Rear-firing or        | Leverages vehicle cabin gain to extend     |
| (20 Hz - 60 Hz)    | Corner-loaded)                            | sub-bass extension cleanly.                |
+--------------------+-------------------------------------------+--------------------------------------------+
When selecting replacement drivers for factory locations, evaluate how off-axis angle impacts high-frequency roll-off. You can reference our resource on choosing the right car speakers to evaluate dispersion metrics. Additional research published by the Audio Engineering Society provides extensive data on wave propagation in small enclosures.
Frequently Asked Questions
Why do my new speakers sound worse than my factory speakers?
Factory speakers are designed with cheap, highly efficient paper cones that boost muddy mid-bass frequencies to mask cabin noise without needing much power. High-end aftermarket speakers feature stiffer cones and neutral frequency responses designed for clean amplification. When dropped into untreated, unamplified factory door cavities, they often reveal cabin resonances and suffer from power starvation, making them sound thin or harsh until properly powered and tuned.
Will adding sound deadening make my car quiet enough without changing speakers?
Yes, installing high-quality Constrained Layer Dampers and Mass Loaded Vinyl significantly reduces road, tire, and wind noise entering the vehicle. Lowering the overall ambient noise floor allows you to hear subtle musical details from your existing system without cranking the volume. However, sound deadening alone cannot fix uneven frequency response or soundstage imaging errors caused by speaker placement.
What is the single most effective upgrade for automotive sound quality?
If you already have basic aftermarket speakers, adding a Digital Signal Processor (DSP) or DSP-amplifier combo yields the largest measurable improvement in sound quality. A DSP allows precision time alignment, active crossover management, and parametric equalization tailored specifically to your vehicle’s unique acoustic floor plan.
How do I know if my car audio system suffers from cabin reflection or phase issues?
If human vocals sound like they are coming directly from your left door panel rather than centered in front of you, your system has time alignment and phase issues. If certain music tracks sound harsh and piercing at higher volumes while lower notes sound hollow or thin, reflective comb filtering and cancellation are degrading the signal path inside the cabin.
Conclusion
Achieving exceptional sound quality in a vehicle requires overcoming the acoustic limitations of the cabin environment. Road noise masks critical low and lower-midrange frequencies, while hard glass and interior plastics reflect sound waves, causing harsh comb filtering and disrupting spatial imaging.
By systematically applying physical sound damping materials to reduce panel vibration and block road noise, you establish a quiet baseline. Following up with active DSP calibration—correcting time delay, crossover points, and parametric EQ—allows you to compensate for irregular vehicle geometry and build a clean, accurate soundstage.
When upgrading your system, consider seeking professional installation and sound tuning. Experts like Sorena Car Audio in Irvine, California provide professional acoustic damping, custom speaker placement, and DSP calibration tailored to your vehicle’s cabin dynamics. Ask for appointment now!
AUTHOR INFORMATION & TRUST SECTION
This guide was prepared using trusted industry sources and reviewed for accuracy, clarity, and usefulness.
We offer all car audio services
List of Services:
- DashCam
- Ambient Lighting
- Starlight
- Windows Tinting
- Armoring & Ballistic Protection
- Apple CarPlay
- Dash Upgrade
- Android Auto
- Paint Protection Film (PPF)
- Sound Deadening – Sound Proofing
- Front and Rear Parking Sensors
- Blind Spot Radars
- Car Ceramic Coating
- HD Backup Camera
- Mirror Monitor
- Subwoofer Integration
- Classic Car Audio
- Wheel Well Sound Deadening
- Marine Audio System
- Marin Audio
- Flipdown Monitor
- Bluetooth Integration
- Rear Entertainment System
- Steerig Wheel Upgrade
- Car Wrapping
- Interior Suede Alcantara Wrap
- Alcantara Suede Headliner
- ECU Tuning
- Center Console Safe Installation
Leave A Comment