

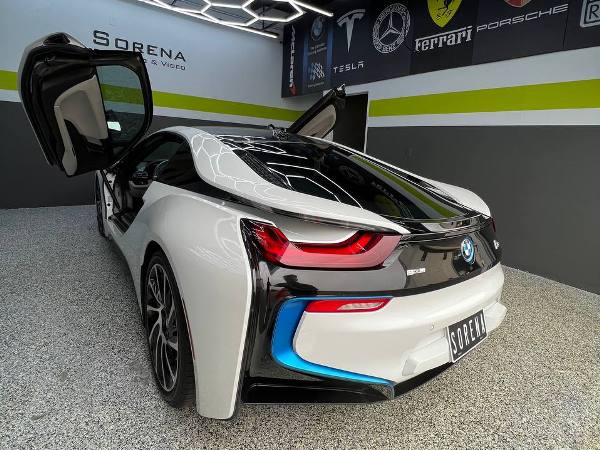
There is nothing quite like the feeling of sliding into your driver’s seat and being greeted by a soft, premium glow. A professional custom interior lighting installation instantly elevates the aesthetic of any vehicle, transforming a dark, mundane cabin into a modern, luxurious cockpit. However, beneath the beautiful colors and dynamic fading effects lies a complex network of wires, fuses, and highly sensitive computer modules.
If you are thinking about adding ambient LEDs to your vehicle, you need to understand that modern cars are essentially rolling computers. Tapping into the wrong wire or using a cheap, poorly grounded kit isn’t just going to give you flickering lights—it can fry your Body Control Module (BCM), trigger endless dashboard warning lights, or even cause an electrical fire.
In our workshop, we fix botched DIY lighting jobs on a weekly basis. We’ve written this guide to walk you through the professional approach to safely wiring ambient LEDs, ensuring your car’s electrical system remains pristine, safe, and fully functional.
Key Takeaways at a Glance
| Factor | Professional Recommendation | Why It Matters |
| Power Source | Fuse Box (via Add-a-Circuit) | Prevents splicing into sensitive factory wiring and avoids BCM damage. |
| Grounding | Bare chassis metal | Ensures a complete, stable circuit. Bad grounds cause 90% of LED flickering. |
| Wire Protection | Tesa tape & split loom | Mimics OEM wiring, prevents chafing, and stops annoying dashboard rattles. |
| Connections | Crimp caps or heat-shrink solder | T-Taps and “Scotch Loks” sever wire strands and vibrate loose over time. |
| Testing | Digital Multimeter (DMM) | Essential for finding true 12V ignition/accessory power sources. |
Why Custom Interior Lighting Installation Requires Absolute Precision
Twenty years ago, wiring a neon tube under your dashboard meant twisting a few wires together and connecting them directly to the battery. Today, a custom interior lighting installation is a fundamentally different ballgame.
Modern vehicles utilize a CAN bus (Controller Area Network) system. This means sensors, switches, and modules constantly “talk” to each other using specific voltage signals. If you incorrectly tap an ambient LED kit into a headlight switch or a door sensor, the BCM detects an unexpected voltage drop. The result? Your car might throw a check engine light, disable the interior dome lights entirely, or refuse to roll down the windows.
Just last month at our Irvine shop, we had a customer bring in a 2023 luxury sedan with a completely dead dashboard. They had attempted to splice a cheap ambient lighting kit into the dimmer switch harness. It overloaded the circuit, melting the factory wire and shorting out the gauge cluster module. A proper installation prevents these costly nightmares by keeping the aftermarket electrical draw completely isolated from the vehicle’s vital data networks.
The Professional Toolkit: What You Need to Safely Wire Ambient LEDs
Before making a single connection, you need the right tools. A professional car audio and electronics technician never guesses. If you want to safely wire your car’s electrical system, throw away the cheap wire nuts and gather these essentials:
- Digital Multimeter (DMM): A test light is not enough for modern cars. A multimeter allows you to measure exact DC voltage and check for continuity without damaging sensitive circuits.
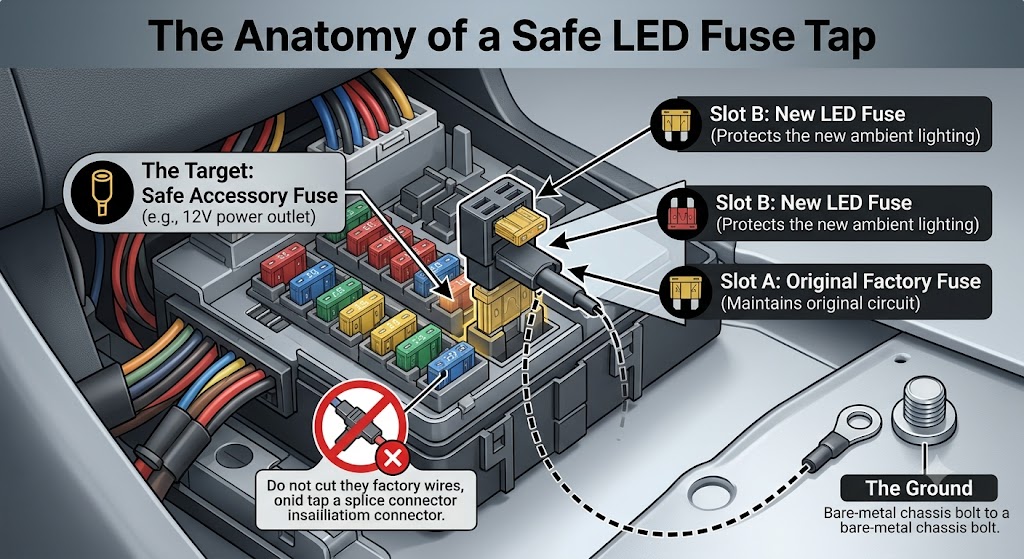
- Add-a-Circuit / Fuse Taps: The absolute holy grail of safe aftermarket lighting. These plug directly into your car’s fuse box, providing a dedicated, fused power line for your LEDs without cutting a single factory wire.
- High-Quality Wire Strippers and Crimpers: For creating clean, secure connections.
- Heat-Shrink Tubing and Heat Gun: To insulate connections and protect them from moisture and dust.
- Tesa Tape (Cloth Electrical Tape): Standard vinyl electrical tape turns into a gooey mess in a hot car. Tesa tape is what factory manufacturers use; it protects wires from chafing and prevents them from rattling against plastic panels.
- Nylon Panel Removal Tools: To safely remove interior trim without scratching your dashboard or snapping plastic retaining clips.
Step-by-Step: The Professional Approach to Ambient LED Wiring
Achieving an OEM-quality finish requires patience and a strict adherence to mobile electronics safety protocols. Here is exactly how we approach a custom interior lighting installation on the bench and in the bay.
Step 1: Planning the Layout and Calculating Power Draw
First, determine where your lighting zones will be: footwells, door cards, center console, or dashboard trim. Map out exactly where the LED strips will mount and where the control module will be hidden.
Next, calculate the amperage draw of your ambient LEDs. Most standard interior LED kits draw between 1 to 3 amps. This is crucial because you must ensure the fuse tap you use, and the circuit you piggyback off, can handle the additional load safely.
Step 2: Finding the Right Power Source (The Fuse Box Method)
We strongly advise against splicing directly into the factory wiring harness. Instead, locate the interior fuse box (usually located under the driver’s side dashboard or behind the glove compartment).
Using your multimeter, you need to find an Accessory (ACC) or Ignition-switched fuse.
- Set your multimeter to DC Volts.
- Ground the black probe to a bare metal bolt on the car chassis.
- With the car completely turned OFF, probe the tops of the fuses. You are looking for a fuse that reads
0.0V. - Turn the car’s ignition to the “ON” or “Accessory” position. Check that same fuse again. If it now reads
12V+, you have found your switched power source.
Workshop Tip: Never tap into fuses related to safety or vital systems, such as airbags (SRS), ECU, or fuel pumps. Stick to fuses for the cigarette lighter, power outlets, or radio.
Step 3: Installing the Add-a-Circuit Fuse Tap
Once you’ve identified the correct fuse, remove it using a fuse puller. Insert that factory fuse into the bottom slot of your Add-a-Circuit. Then, insert a new fuse (usually 3A or 5A, depending on your LED kit’s requirement) into the top slot.
Crimp the power wire of your ambient LED control box to the pigtail of the Add-a-Circuit, and plug the entire assembly back into the fuse board. You have now safely sourced power without altering the car’s fundamental wiring structure. For more detailed standards on automotive electrical safety, we always refer to guidelines set by the Mobile Electronics Certified Professional (MECP) program, which dictates the safest ways to integrate aftermarket accessories.
Step 4: Grounding – The Most Common Point of Failure
If we had a dollar for every flickering LED issue caused by a bad ground, we could fund a completely new shop. A circuit is only as strong as its ground.
Do not rely on factory ground wires if you can avoid it. Instead, find a solid, bare metal bolt that connects directly to the vehicle’s chassis.
- Remove the bolt.
- If the metal underneath is painted, use a small piece of sandpaper to scrape away the paint until you see shiny, bare metal.
- Crimp a ring terminal onto the ground wire of your LED kit.
- Place the ring terminal over the hole and tighten the bolt back down firmly.
Step 5: Routing the Wiring for an OEM-Style Integration
With power and ground established, it’s time to route the wires to the LED strips. This separates the amateurs from the pros.
Wrap all aftermarket wiring in Tesa tape. Zip-tie the wiring along existing factory wire harnesses. Ensure wires are routed completely clear of moving parts like the steering column, brake pedal, or seat tracks. A pinched wire is a fast track to a blown fuse or an electrical fire. If you are also considering upgrading your car’s battery and alternator to handle massive audio systems alongside lighting, keeping your wiring organized is even more critical.
Avoiding Common Electrical Disasters
When researching how to safely wire ambient LEDs, you will undoubtedly encounter “T-Taps” or “Scotch Loks.” These are plastic connectors that bite into a wire to splice power. Do not use them.
In our experience, T-Taps physically sever the copper strands inside the factory wire, reducing its current-carrying capacity and creating a bottleneck for heat. Furthermore, car interiors endure extreme temperature fluctuations and heavy vibrations. Over time, T-Taps loosen, leading to intermittent connections, arcing, and sparking.
If you absolutely must connect two wires directly, the only acceptable methods are military-style splicing (stripping, wrapping, soldering, and heat-shrinking) or using high-grade, heat-shrinkable crimp connectors. It takes an extra five minutes per connection, but it guarantees a lifetime of flawless operation.
Additionally, if you are removing door panels to install lighting, this is the perfect time to look into advanced sound deadening techniques. You already have the panels off; adding acoustic treatment will make your cabin quieter, allowing you to enjoy your new luxurious atmosphere in peace.
Frequently Asked Questions (FAQ)
Will installing aftermarket ambient lighting void my car’s warranty?
If installed correctly using the Add-a-Circuit method, it should not void your warranty. Because you are not cutting or modifying the factory wiring harness, the installation is completely reversible. However, if you splice into factory wires and short out a module, the dealership will likely void the warranty for that specific electrical repair.
Why do my new interior LEDs stay on after I turn the car off?
You tapped into a “constant 12V” power source rather than a “switched” (ignition/accessory) source. Constant power is always live, meaning it will eventually drain your car battery. You need to use a multimeter to find a fuse that only receives power when the key is turned.
Can I run my interior LEDs directly to the car battery?
Technically yes, but it is highly impractical for interior lighting. You would have to manually turn them on and off with a separate switch every time you drive, and penetrating the car’s firewall to run the wire increases the risk of moisture leaks. The interior fuse box is much safer and more efficient.
What is the best way to stop the LED wiring from rattling inside the dashboard?
Wrap all exposed aftermarket wiring in automotive-grade Tesa cloth tape, and zip-tie the wires to existing, securely fastened factory wire looms.
Elevate Your Drive with Professional Custom Lighting
A custom interior lighting installation is one of the most striking upgrades you can make to your vehicle’s cabin. It brings a modern, personalized touch that makes every night drive feel like an event. But as we’ve outlined, the line between a luxurious upgrade and a massive electrical headache is razor-thin. It requires an understanding of voltage, proper grounding techniques, and an absolute refusal to cut corners.
If you are uncomfortable poking around your vehicle’s fuse box with a multimeter, or if you simply want the peace of mind that comes with a flawless, OEM-quality installation, you don’t have to do it alone.
Are you ready to transform your vehicle’s interior without risking its electrical system? If you are in Southern California, bring your car to the experts. Contact Sorena Car Audio in Irvine, California today to schedule your professional custom interior lighting installation. Our expert technicians will seamlessly integrate premium lighting into your vehicle, guaranteeing a stunning, safe, and warranty-friendly result.
Sorena Car Audio Verification Box
This comprehensive guide was written, reviewed, and approved by a senior specialist at Sorena Car Audio in Irvine, CA. With years of hands-on, daily experience in premium automotive acoustics, smart vehicle upgrades, and complex 12-volt electrical diagnostics, our team ensures every piece of advice meets the highest industry standards for safety and performance.
We offer all car audio services
List of Services:
- DashCam
- Ambient Lighting
- Starlight
- Windows Tinting
- Armoring & Ballistic Protection
- Apple CarPlay
- Dash Upgrade
- Android Auto
- Paint Protection Film (PPF)
- Sound Deadening – Sound Proofing
- Front and Rear Parking Sensors
- Blind Spot Radars
- Car Ceramic Coating
- HD Backup Camera
- Mirror Monitor
- Subwoofer Integration
- Classic Car Audio
- Wheel Well Sound Deadening
- Marine Audio System
- Marin Audio
- Flipdown Monitor
- Bluetooth Integration
- Rear Entertainment System
- Steering Wheel Upgrade
- Car Wrapping
- Interior Suede Alcantara Wrap
- Alcantara Suede Headliner
- ECU Tuning
- Center Console Safe Installation
Leave A Comment