

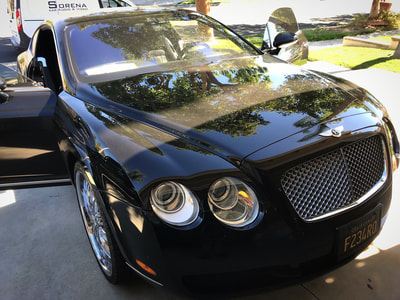
You are driving down the Pacific Coast Highway, enjoying the California sun, when another driver suddenly cuts you off, causing a near-miss—or worse, a minor collision. In that split second, a dash cam shifts from a cool tech gadget to your most vital legal protection. However, many drivers assume that buying a high-end camera is the end of the journey. They unpack the box, use the included cigarette lighter adapter, and leave a dangling cord hanging across their dashboard.
When searching for the best dash cam installation near me, the real question isn’t just about positioning the camera on the glass. It is about how that camera receives its power. In our workshop, we routinely see premium vehicles come in with unstable DIY camera setups that fail exactly when they are needed most.
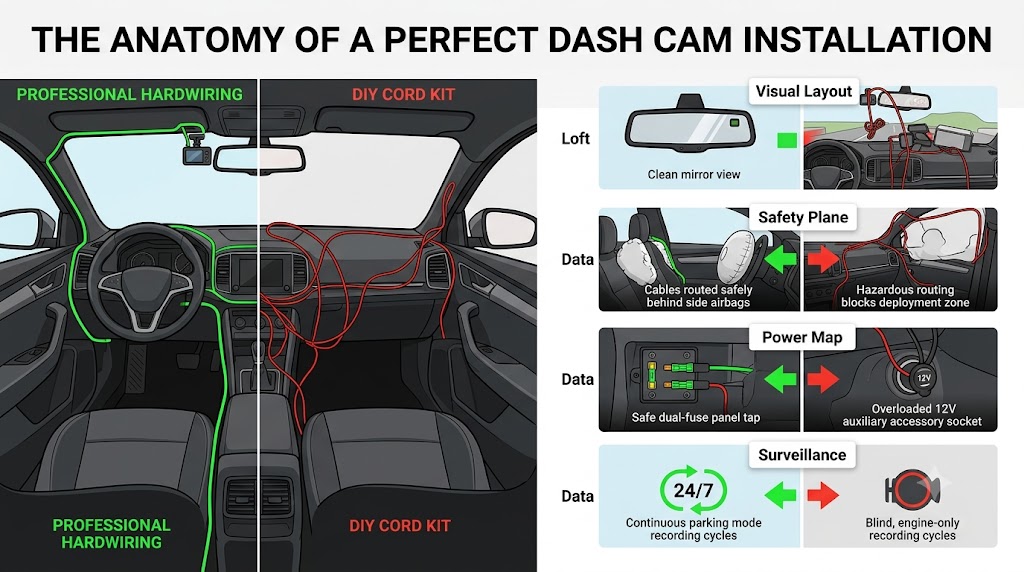
If you want absolute reliability, clean aesthetics, and 24/7 surveillance, a professional hardwire installation is the only way to go. Let’s break down exactly why hardwiring beats temporary plug-in cord kits, especially for car audio fans and enthusiast drivers across California.
Key Takeaways at a Glance
| Feature / Benefit | Professional Hardwire Installation | DIY Plug-In Cord Kits |
| Power Source | Direct connection to the vehicle’s fuse box | Cigarette lighter / 12V auxiliary port |
| Parking Mode Protection | Yes — Full 24/7 surveillance with low-voltage cutoff | No — Turns off completely when the ignition is killed |
| Visual Aesthetics | 100% hidden wiring; factory-clean finish | Unsightly dangling wires across the dash |
| Port Availability | Keeps your 12V and USB ports open for phone chargers | Occupies your primary cabin power outlet |
| Electrical Safety | Circuit-protected via dedicated fuse taps | Risk of loose connections or blown accessory fuses |
| Heat Resilience | High — Built to withstand cabin temperatures up to 150°F | Variable — Hanging wires degrade in intense California sun |
The Core Difference: Power Delivery and Parking Mode
The most critical drawback of a DIY plug-in kit is how it draws electricity. A standard 12V accessory adapter only supplies power when your vehicle’s ignition is turned on. The moment you park your car, turn off the engine, and lock the doors, your dash cam dies.
For car enthusiasts in California, leaving a vehicle unattended in a busy public parking lot comes with inherent risks. According to the Insurance Information Institute (III), vehicle vandalism and hit-and-run incidents in crowded metro areas remain a persistent issue for vehicle owners.
HOW HARDWIRING WORKS

[Fuse Box] ---> [Hardwire Kit / Battery] ---> [Dash Cam]
     |                                             |
     +--> Switched Power (Ignition Trigger)        |
     +--> Constant Power (Parking Mode Source)     |

Result: Seamless switching between driving & parking modes
When our team performs a professional hardwire installation, we tap directly into your vehicle’s internal fuse panel using specialized, circuit-protected hardware. We locate two distinct power profiles:
- Switched Power (ACC): Tells the camera you are driving.
- Constant Power (BATT): Keeps the camera alive when the car is off.
This dual-rail power delivery unlocks Parking Mode. Modern dual-lens systems like the premium models found on our Sorena Car Audio Dashcam Service Page use intelligent parking surveillance. They sit in a low-power standby state and instantly trigger recording if a built-in G-sensor detects an impact, or if radar motion sensors detect someone hovering too close to your vehicle. Without a hardwired connection, this baseline security layer is completely non-functional.
The Danger of California Heat on Hanging Wires
California weather is legendary, but intense interior cabin temperatures pose a silent threat to poorly installed electronics. When a vehicle sits under the summer sun in areas like the Central Valley, Inland Empire, or Southern California, interior cabin temperatures can rapidly climb past 140°F.
[Outside Air: 95°F]  ===>  [Dashboard Surface: 150°F+]

[DIY Hanging Cords]                          [Professional Hardwiring]
• Softens adhesive mounts                    • Cables tucked deep inside panels
• Heavy dangling wires pull on glass         • No leverage or weight on the mount
• Continuous UV exposure degrades            • Protected from direct solar radiation
  cheap PVC insulation
When we tested generic DIY power cords left exposed on a dashboard, we noticed that the heavy PVC insulation softens significantly under extreme thermal loads. The physical weight of a dangling wire pulling down on a hot windshield creates leverage. Over time, this constant downward tension causes the camera’s adhesive mount to fail, leaving your expensive dash cam baking on the floorboards.
Furthermore, loose wires vibrating against interior plastics during regular driving cause distracting cabin rattles that degrade your driving experience. Professional routing tucks the power loom deep inside the A-pillars and headliner, completely shielding the wiring from direct UV exposure and keeping structural stress off the camera body.
Safeguarding Your Vehicle’s Complex Electrical System
Modern vehicles—especially European luxury brands and modern Electric Vehicles (EVs)—are rolling computers. Their electrical architecture is managed by sensitive electronic control modules (ECMs) that monitor current draw down to the milliamp.
A common mistake we see drivers make when choosing a DIY approach is routing a cheap USB cable around the weatherstripping and forcefully jamming it behind side-curtain airbags.
⚠️ Critical Safety Hazard: If an amateur installer runs a power wire over the top of an airbag module inside the A-pillar, the wire can physically tie down or slice through the nylon bag during a collision, completely disrupting its deployment geometry.
A-PILLAR CROSS SECTION: THE DANGEROUS VS. SAFE PATH

  [Wrong Way: DIY Over-the-Bag]        [Right Way: Pro Factory Loom]
  +-------------------------+          +-------------------------+
  |  (O) Airbag Cylinder    |          |  (O) Airbag Cylinder    |
  |   |                     |          |                         |
  |   X <-- CABLE OVER BAG  |          |   X <-- CABLE BEHIND    |
  |                         |          |        TUCKED TO LOOM   |
  +-------------------------+          +-------------------------+
During our standard workshop installation sequence, our technicians carefully drop the pillar plastics, locate the factory wiring loom running behind the explosive side-curtain airbag canister, and zip-tie the dash cam power lines directly to the vehicle’s structural harness. This guarantees that your safety systems remain uncompromised and fully operational.
Additionally, a true professional hardwiring kit features an integrated Low-Voltage Cutoff Module. If your vehicle sits parked for an extended period, the module monitors your primary 12V starter battery. If the voltage drops below a specific threshold (typically 11.8V to 12.0V), the hardwire kit safely disconnects power to the dash cam, ensuring your car always has enough cranking power to start seamlessly.
Why True Car Audio Fans and Enthusiasts Choose Professional Integration
For car audio fans, structural interior integrity and clean design lines are everything. If you have spent time and resources building a high-fidelity sound stage, the last thing you want to see is an exposed wire cutting across your center console, occupying your only fast-charging utility port.
Clean Visual Integration
A professionally installed system is almost invisible. The front camera sits perfectly tucked behind or adjacent to the rearview mirror assembly, matching the factory plastic shrouds. The rear-facing camera wire runs clean through the factory rubber conduits linking the chassis to the trunk lid or rear hatch glass, completely eliminating loops of loose wire that can catch on cargo.
Seamless Power Management
High-end dash cams can draw significant power during high-definition, multi-channel processing. To protect the vehicle’s primary starting battery during long parking cycles, enthusiasts often opt for a dedicated Dash Cam Expansion Battery.
This specialized lithium-iron-phosphate (LiFePO4) battery pack hides under a seat or inside the trunk panel. It charges rapidly while you drive and powers your surveillance system cleanly when parked, removing 100% of the electrical strain from your vehicle’s primary electrical system. Tapping this battery safely into your vehicle’s alternator circuit requires advanced knowledge of relay wiring and power management—tasks built for a professional car audio workshop.
Our Installation Sequence
- Pre-Flight System Bench Test (10 Minutes): Before removing a single factory panel, connect the front and rear cameras to a stabilized bench power supply to verify firmware stability, camera sensor calibration, and Wi-Fi pairing configurations.
- Safe Routing Behind Airbag Channels (25 Minutes): Carefully unclip the A-pillar trims and overhead consoles. Use a non-marring bone tool to guide the premium shielded power loom along the structural roof frame, ensuring it sits entirely behind the deployment plane of all side-curtain airbags.
- Fuse Panel Mapping & Circuit Isolation (20 Minutes): Use a digital multimeter to scan the interior junction block. Identify an isolated, non-critical constant power fuse (like power seats) and a switched accessory fuse (like the cigar lighter). Avoid critical safety modules like SRS or ABS.
- Add-A-Circuit Fuse Tap Integration (15 Minutes): Crimp professional-grade Add-A-Circuit taps onto the camera harness. Insert a dedicated low-amperage fuse for the camera alongside the original factory fuse, completely isolating the new circuit from the vehicle’s factory electronic infrastructure.
- Grounding and Thermal Stress Check (15 Minutes): Secure the system ground wire to an unpainted, structural factory chassis bolt. Secure all loose loom slack using high-temperature automotive cloth Tesa tape to eliminate cabin rattles and prevent heat-induced chaffing.
Frequently Asked Questions
Will hardwiring a dash cam void my new car warranty?
No. Under the federal Magnuson-Moss Warranty Act, a manufacturer cannot arbitrarily void your vehicle warranty simply because an aftermarket accessory was installed. The dealer must conclusively prove that the aftermarket component directly caused the specific failure. By using non-destructive Add-A-Circuit fuse taps, professional installations leave zero footprint and do not splice or cut your factory wires.
How long can a hardwired camera run in Parking Mode before cutting off?
Depending on your vehicle’s battery capacity, health, and ambient temperatures, a standard 12V lead-acid car battery can safely power a dual-channel camera for anywhere from 12 to 24 hours before hitting the low-voltage safety cutoff. For extended multi-day parking coverage, we strongly recommend integrating a dedicated dash cam battery pack.
Why shouldn’t I just buy a cheap DIY hardwire kit online?
Many inexpensive online hardwire kits use low-tier voltage regulators that emit massive amounts of Electromagnetic Interference (EMI). In our experience at the shop, this unshielded radio interference can corrupt your vehicle’s AM/FM radio signal, disrupt keyless entry fobs, and even degrade your car’s internal GPS tracking systems. Premium kits feature heavily shielded circuitry to prevent these issues.
Conclusion: Protect Your Asset the Right Way
A high-performance dash cam is a smart investment that provides invaluable piece of mind on unpredictable roads. However, a camera is only as dependable as the power line keeping it alive. Forgoing professional integration to save a few minutes with a dangling cord leaves your car unprotected when parked, risks damaging your vehicle’s safety systems, and introduces a messy aesthetic to your cabin.
Don’t compromise on your vehicle’s electrical safety or security. Trust a specialist team to build a completely hidden, seamless surveillance network that guards your vehicle around the clock.
Sorena Car Audio Verification & Quality Assurance
This comprehensive guide was written, reviewed, and approved by a senior Sorena Car Audio specialist. Our technical team leverages decades of combined, hands-on experience in premium car audio fabrication, intricate multi-stage vehicle wiring, and high-end security integration. We ensure every configuration respects your vehicle’s factory electrical parameters while maximizing the performance of your onboard tech.
Ready to upgrade your vehicle’s security with a flawless, completely hidden, and reliable installation? Visit our dedicated Sorena Car Audio Dashcam Service Page to book a consultation with our local experts today.
We offer all car audio services
List of Services:
- DashCam
- Ambient Lighting
- Starlight
- Windows Tinting
- Armoring & Ballistic Protection
- Apple CarPlay
- Dash Upgrade
- Android Auto
- Paint Protection Film (PPF)
- Sound Deadening – Sound Proofing
- Front and Rear Parking Sensors
- Blind Spot Radars
- Car Ceramic Coating
- HD Backup Camera
- Mirror Monitor
- Subwoofer Integration
- Classic Car Audio
- Wheel Well Sound Deadening
- Marine Audio System
- Marin Audio
- Flipdown Monitor
- Bluetooth Integration
- Rear Entertainment System
- Steering Wheel Upgrade
- Car Wrapping
- Interior Suede Alcantara Wrap
- Alcantara Suede Headliner
- ECU Tuning
- Center Console Safe Installation
Leave A Comment