Car ambient lighting adds a touch of personality and sophistication to your vehicle’s interior. It can also enhance visibility and create a more relaxing driving experience. If you’re looking to transform your car’s atmosphere with a DIY ambient lighting installation, this guide will equip you with the knowledge and steps to achieve stunning results.
Before You Begin: Planning and Preparation
- Choosing Your Lighting Kit: Consider factors like lighting type (LED strips, neon tubes, etc.), color options, and desired lighting effects (static, color-changing, music-synced). Budget also plays a role, with simpler kits being more affordable.
- Gather the Tools: You’ll likely need basic tools like a plastic trim removal tool, wire cutters/strippers, electrical tape, zip ties, screwdriver, and rubbing alcohol for cleaning surfaces.
- Download a Car Interior Diagram (Optional): This can be helpful for identifying hidden wires and avoiding potential electrical issues. Some car manufacturers offer them online.

Installation Steps:
- Power Source Selection: Decide where to connect your ambient lighting kit’s power source. Common options include the cigarette lighter socket (least recommended due to constant power draw), a fuse box (requires knowledge of car electricals), or directly to the battery (most complex but offers dedicated power). If you’re unsure about electrical work, consult a professional.
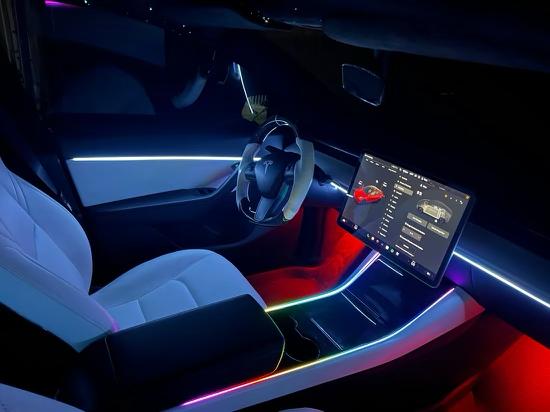
- Planning the Route: Sketch a layout for your lighting strips, considering aesthetics and ease of concealment. Aim for areas like footwells, door panels, under the dashboard, or along the center console.
- Cleaning and Mounting: Clean the mounting surfaces with rubbing alcohol to ensure proper adhesion. Most kits come with adhesive backing for the light strips. For a more secure fit, you can use additional zip ties or clips.
- Wire Routing: Carefully route the wires following your pre-planned layout. Utilize trim removal tools to access hidden spaces behind panels and avoid pinching wires. Tuck wires neatly and use zip ties to secure them for a clean look.
- Connection and Testing: Connect the light strips to the central control box according to the kit’s instructions. Once everything is wired, test the lights to ensure they function properly.
- Power Connection: Following your chosen power source method, connect the control box to the power source. Double-check all connections before turning on the system.
- Customization (Optional): Many kits offer features like remote controls or smartphone apps to adjust brightness, color, and lighting effects. Explore these options to personalize your ambient lighting experience.

Additional Tips for Success:
- Start Small: If you’re new to DIY car modifications, begin with a basic lighting kit and a limited installation area. You can always add more later.
- Safety First: Always disconnect the car battery before working on electrical components.
- Read the Manual: Thoroughly read and understand your car’s owner’s manual and the ambient lighting kit’s instructions to ensure compatibility and safe installation.
- Seek Professional Help (if needed): Don’t hesitate to seek assistance from a qualified car audio installer if you’re uncomfortable with electrical work or encounter any difficulties.
Enjoy Your Illuminated Ride!
With careful planning and these handy steps, you can transform your car’s interior with a stunning ambient lighting setup. Remember to take your time, prioritize safety, and unleash your creativity to design an illumination that reflects your style and enhances your driving experience. So, crank up the music, dim the main lights, and enjoy the captivating ambiance you’ve created within your car!
Leave A Comment