

Tired of shouting over the drone of highway asphalt during your daily commute? Does your car’s stereo system sound thin, tinny, and washed out by tire roar?
Vehicle manufacturers regularly use thin sheet metal to meet fuel-efficiency standards. While great for mileage, these uninsulated door panels, floors, and trunks act like massive metal drums—amplifying every road bump, tire rotation, and engine vibration directly into your cabin.
Car sound deadening is the application of specialized viscoelastic materials, acoustic barriers, and decouplers to stop structural panel vibration and block airborne road noise.
Whether you are an audiophile chasing studio-quality sound, a daily commuter looking for highway peace, or deciding between a weekend DIY project and a professional shop installation, this guide breaks down the science, real-world costs, step-by-step techniques, and exact material choices you need.
1. The Acoustic Science: How Car Soundproofing Actually Works
To make a car quiet, you cannot simply stick a single roll of foam inside a door and expect luxury-car silence. Vehicle cabin noise consists of two distinct physical phenomena that require completely different treatment methods: structural noise and airborne noise.
Structural Noise (Vibrations & Resonance)
When your tires hit coarse pavement, mechanical energy travels through your suspension and flexes the car’s sheet metal. This creates low-frequency resonance—that deep, head-throbbing drone you feel as much as you hear.
- The Fix: Vibration Damping. Adding dense, flexible mass directly to flat sheet metal changes its resonant frequency, turning kinetic movement into harmless low-level thermal energy.
Airborne Noise (Road, Wind, and Engine Drone)
Airborne noise consists of sound waves traveling through the air—tire sizzle on wet pavement, wind rushing past side windows, and exhaust hum.
- The Fix: Acoustic Barrier Reflection. Airborne sound waves cannot be stopped by thin vibration mats. They require heavy, dense mass barriers that physically reflect sound waves back outside the vehicle.
Decibels Demystified: The Sorena Benchmark Study
Sound pressure level is measured on a logarithmic scale. Every 3 dB reduction cuts sound energy in half, while a 10 dB reduction represents a 50% drop in perceived loudness to the human ear.
To demonstrate what proper multi-layer soundproofing achieves, our technicians at Sorena Car Audio tested a stock 2024 Honda Civic on California Interstate 405 at a constant 65 mph:
- Stock Factory Baseline: 74.2 dB (Significant tire roar and cabin echo; phone calls required raising voice).
- Stage 1 Treatment (Doors & Trunk CLD): 70.8 dB (3.4 dB drop; mid-bass punch improved, high-frequency rattles eliminated).
- Stage 2 Full Treatment (Floor, Firewall, Doors, Trunk CLD + CCF + MLV): 63.5 dB (10.7 dB total reduction; more than 50% drop in perceived cabin volume, matching luxury sedan acoustics).
2. The 3 Essential Sound Deadening Materials Explained
Achieving maximum quietness requires a multi-layered approach using three distinct material types. No single product can handle all sound frequencies.
Layer 1: Constrained Layer Dampers (CLD) — Vibration Control
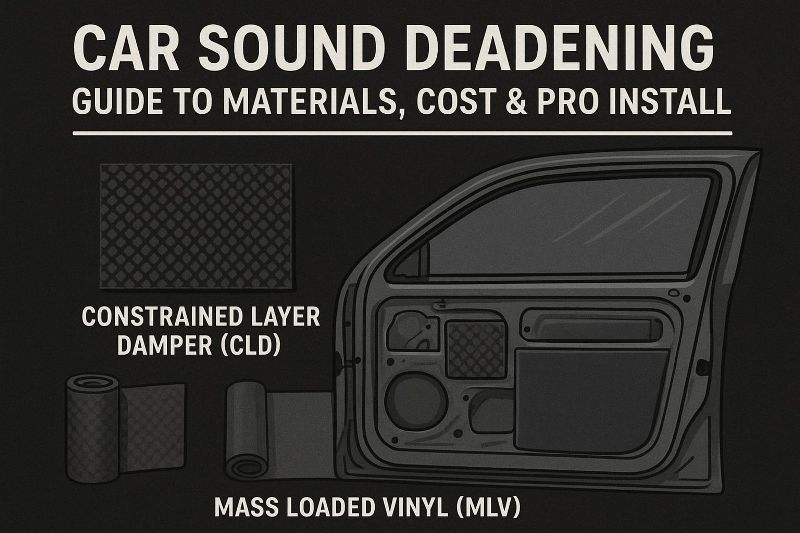
CLD mats are peel-and-stick sheets made of viscoelastic butyl rubber topped with a thick constraining layer of aluminum foil.
- Primary Function: Damping panel resonance and flex.
- Where It Goes: Directly onto clean, bare interior sheet metal (doors, floor pan, trunk, roof).
- Pro Tip: You do not need 100% panel coverage with CLD. Applying CLD to 25% to 50% of a flat metal panel’s surface area eliminates up to 90% of its structural resonance. Covering 100% of a panel with CLD adds unnecessary weight without meaningful noise gains.
Layer 2: Closed-Cell Foam (CCF) — Decoupling & Absorption
Closed-cell foam is a light, waterproof foam layer that serves as an acoustic decoupler.
- Primary Function: It isolates hard surfaces to prevent plastic trim panels from rubbing against sheet metal (eliminating squeaks) and acts as an acoustic cushion.
- Where It Goes: Placed on top of the CLD layer before installing heavy barriers, or attached behind plastic door cards and dashboard trims.
- Crucial Distinction: Unlike open-cell foam (which acts like a sponge and holds moisture), quality CCF will not absorb water, making it safe for inside door cavities.
Layer 3: Mass Loaded Vinyl (MLV) — Airborne Sound Barrier
MLV is a limp, extremely dense vinyl sheet loaded with high-mass minerals (typically barium sulfate). It usually weighs 1 lb per square foot.
- Primary Function: Blocking high- and mid-frequency airborne road noise.
- Where It Goes: Over the floor pan, firewall, and trunk floor.
- Key Requirement: MLV must be installed with 100% seamless coverage. Because sound waves act like water, even a small gap or unsealed seam in your MLV layer will let airborne noise leak through. It must also be “decoupled” from the metal using CCF so it does not transmit vibrations directly.
Alternative Coatings: Liquid & Spray-On Deadeners
Liquid viscoelastic coatings are designed for tight, intricate areas where adhesive mats cannot lie flat, such as exterior wheel wells and frame corners. While effective for localized vibration damping, spray-ons cannot replace heavy MLV sheets for blocking airborne tire noise.
Material Comparison Matrix
| Material Type | Composition | Primary Acoustic Function | Required Coverage | Typical Material Cost |
|---|---|---|---|---|
| CLD (Butyl Mat) | Viscoelastic Butyl + Foil | Damps structural metal vibration | 25% – 50% | $1.50 – $4.00 / sq ft |
| CCF (Closed-Cell Foam) | Polyethylene/Neoprene Foam | Decouples layers & stops trim squeaks | 100% in target areas | $0.75 – $2.00 / sq ft |
| MLV (Mass Loaded Vinyl) | High-density Mineralized Vinyl | Blocks airborne road, engine & tire noise | 100% seamless coverage | $2.50 – $6.00 / sq ft |
| Spray-On Coating | Water-based Butyl Polymer | Damps hard-to-reach contours | 100% of targeted recess | $30.00 – $50.00 / can |
3. Critical Application Zones: Where to Target for Maximum Impact
If you are working with a targeted budget or phased installation, prioritize your vehicle’s application zones based on your main goal:
1. The Doors: The Audio Sweet Spot (High Priority)
Car doors are large hollow chambers made of thin sheet metal, positioned right next to your ears.
- Why Treat Them: Treating doors delivers the highest return on investment for car audio clarity.
- How To Treat: Apply CLD mats to 50% of the outer door skin inside the cavity. Next, apply CLD over the inner door frame to seal factory access holes. This seals the door cavity, converting it into a rigid, enclosure-like baffle that amplifies speaker mid-bass performance while eliminating panel rattles.
2. The Floor Pan & Firewall: Tackling Tire & Engine Noise (High Priority)
The cabin floor sits directly over your tires, suspension, and exhaust system.
- Why Treat Them: The floor is the primary entry point for low-frequency road hum and highway tire noise.
- How To Treat: Apply CLD tiles to flat metal floor sections. Lay a continuous layer of CCF over the floor, and top it with a seamless 100% coverage sheet of heavy MLV extending as high up the firewall as possible.
3. The Trunk & Wheel Wells: Eliminating Exhaust Drone (Medium Priority)
In sedans, hatchbacks, and SUVs, the trunk acts like a giant megaphone that amplifies rear wheel noise and exhaust resonance throughout the cabin.
- Why Treat Them: Essential for stopping highway exhaust drone and rear-tire hum.
- How To Treat: Focus CLD application heavily on the inner wheel arches (the highest resonance zones in any vehicle) and the spare tire tub. Cover the trunk floor with CCF and MLV.
4. The Roof & Hood: Rain Impact & Thermal Insulation (Lower Priority)
- Why Treat Them: Rain hitting an uninsulated roof sounds like a tin can. The roof also absorbs massive amounts of solar heat.
- How To Treat: Drop the headliner and apply 40% CLD coverage to the roof skin to turn rain noise into a soft, muted thump. Adding a lightweight thermo-acoustic foam layer also reduces air conditioning load in summer.
4. DIY vs. Professional Installation: Cost & Effort Breakdown
Deciding between a DIY weekend project and hiring a professional car audio shop comes down to your available time, comfort with vehicle disassembly, and performance expectations.
DIY Soundproofing: Budget Kits & Reality Check
Doing the work yourself saves on labor costs, but requires patience, proper tools, and careful panel disassembly.
- Budget Materials: $200 to $600 for a high-quality CLD bulk pack, CCF sheets, and MLV rolls.
- Time Required: 15 to 40 hours of manual labor depending on vehicle size and coverage.
- Skill Level: Intermediate. You must safely disconnect batteries, unplug airbag harnesses, unbolt seats, and pry delicate plastic trim clips without breaking them.
Professional Installation: What Drives Shop Pricing?
When you hire a specialized shop like Sorena Car Audio, you pay for trained technicians, specialized installation tools, exact material fitment, and guaranteed workmanship.
- Partial Treatment (Doors & Trunk): $700 to $1,200 (Ideal for audio upgrades and minor road noise reduction; 1-day turn-around).
- Full Road Noise Treatment (Floor, Firewall, Doors, Trunk): $1,500 to $2,800 (Complete vehicle gutting, triple-layer application; 2-3 days).
- Concourse Full Vehicle Package (Includes Roof, Hood, Wheel Wells): $2,800 to $4,500+ (Full cabin transformation achieving luxury-level silence).
DIY vs. Professional Feature Comparison
| Feature / Factor | DIY Installation | Professional Shop Installation |
|---|---|---|
| Out-of-Pocket Cost | $200 – $600 (Materials only) | $700 – $3,500+ (Turn-key) |
| Time Investment | 15 – 40+ hours over multiple weekends | 1 – 3 business days (Vehicle drop-off) |
| Risk Factor | High risk of broken trim clips or wiring faults | Zero risk; backed by shop insurance & warranty |
| Installation Quality | Variable based on roller pressure & technique | Perfect adhesion, zero air bubbles, factory fit |
| Acoustic Performance | Good (3 dB – 6 dB drop typical) | Maximum (8 dB – 12 dB drop typical) |
5. Step-by-Step DIY Installation Guide
If you decide to tackle a DIY sound deadening project, follow this step-by-step workflow to ensure safety and maximum acoustic performance.
Essential Tools Needed
- Heavy-duty steel sound deadening roller (2-inch width)
- Isopropyl alcohol (90%+ concentration) and microfiber towels
- Utility knife with fresh blades & heavy-duty shears (for cutting MLV)
- Plastic trim removal pry tool set
- Mechanic socket set and Torx bits (for seat removal)
- Work gloves (aluminum foil edges on CLD mats are extremely sharp)
Step 1: Interior Disassembly
Disconnect your vehicle’s negative battery terminal to prevent accidental airbag light triggers or electrical shorts. Using plastic trim tools, carefully unclip door panels, carpet thresholds, and trim pieces. Unbolt seats and remove carpet to expose bare sheet metal.
Step 2: Surface Degreasing (Crucial Step)
Adhesive mats will fail if applied over factory wax, grease, or dirt. Thoroughly scrub every square inch of bare metal with isopropyl alcohol until your cleaning towel comes away completely white. Allow the metal to dry completely.
Step 3: Measuring & Applying CLD
Measure target flat metal areas. Cut your CLD mat into manageable sheets (10″ x 12″ panels are easier to handle than massive rolls). Peel off the backing paper, place the butyl side onto the center of large metal panels, and tack it down.
Step 4: Rolling for Adhesion
Peel-and-stick mats do not damp sound until they are fully bonded to the metal. Firmly run your steel roller over the aluminum foil face using heavy hand pressure. You must roll the material flat until the factory dimpled texture on the aluminum foil becomes completely smooth. This squeezes out trapped air pockets and forces the butyl rubber into the metal’s grain structure.
Step 5: Applying Decoupler (CCF) & Barrier (MLV)
Adhere a continuous layer of Closed-Cell Foam directly over the CLD or back of trim panels. Next, cut your Mass Loaded Vinyl sheet to cover the entire floor pan with zero gaps. Secure MLV seams using heavy-duty acoustic vinyl tape to form an airtight barrier.
Step 6: Reassembly
Refit factory carpet and trim panels. Ensure wiring looms sit in factory channels without being pinched beneath dense MLV. Reinstall seats, torque bolts to manufacturer specifications, reconnect the battery, and test all electrical features (power windows, door locks, speakers) before hitting the road.
6. Critical Soundproofing Mistakes to Avoid
Avoid these four common installation mistakes that ruin acoustic results or damage vehicles:
- Using Asphalt Roofing Products Instead of Butyl Rubber:
Cheaper roofing tapes look similar to CLD mats, but use asphalt-based adhesives. Inside a warm car cabin, asphalt melts, off-gasses toxic chemical fumes, loses adhesion, and drops to the bottom of door cavities, creating a sticky, tar-like mess. Always use 100% automotive-grade butyl rubber mats.
- Covering 100% of Panels with CLD:
Plastering every square inch of sheet metal with heavy CLD mat adds hundreds of pounds of useless weight to your car without adding acoustic benefit. Stick to 25% to 50% strategic panel coverage for CLD, and save 100% full coverage for your MLV barrier layer.
- Leaving Air Bubbles Beneath CLD Mats:
Air pockets trapped beneath sound mats act as thermal insulation cushions that prevent vibrational energy from entering the viscoelastic butyl layer. Trapped moisture can also cause hidden rust. Always roll mats flat until smooth.
- Leaving Gaps in Your MLV Barrier:
Airborne sound waves leak through unsealed gaps like air through a hole in a tire. If your MLV installation leaves 5% of the floor unsealed, you lose up to 50% of the barrier’s potential airborne noise blocking capability.
7. Frequently Asked Questions (FAQ)
How much weight does sound deadening add to a car?
A partial treatment (doors and trunk) using strategic 30% CLD coverage adds approximately 15 to 25 lbs, which has zero noticeable impact on fuel economy or acceleration. A full-vehicle luxury conversion using CLD, CCF, and 100% floor MLV adds between 60 and 100 lbs—equivalent to carrying a small extra suitcase in your trunk.
Can sound deadening make my car completely silent?
No vehicle can be made 100% silent, as glass windows and air vents continue to transmit some ambient sound waves. However, a properly executed multi-layer sound deadening treatment will reduce cabin noise by 8 dB to 12 dB, cutting perceived background road noise by more than half and dramatically improving conversation clarity and audio quality.
Why shouldn’t I use asphalt-based deadening mats?
Asphalt-based mats are designed for home roofing, not vehicles. Car interiors regularly reach temperatures over 150°F (65°C) when parked in the sun. At these temperatures, asphalt releases toxic petroleum fumes, breaks down, off-gasses, and loses its adhesive bond, slumping into doors and ruining electrical components.
How much decibel reduction can I expect from full sound deadening?
A full multi-layer treatment (CLD on metal, CCF decoupler, and 100% MLV barrier on floors/firewall) typically achieves a 6 dB to 12 dB drop in road noise. Because decibels use a logarithmic scale, an 8 dB reduction cuts background noise energy by roughly 60%.
Transform Your Driving Experience
Eliminating intrusive road noise, harsh tire whine, and panel rattles transforms your daily commute into a serene, comfortable journey. Whether you choose a hands-on DIY installation or prefer the precision, speed, and lifetime warranty of a professional shop installation, investing in proper sound deadening is one of the most rewarding upgrades you can make to your vehicle.
Ready to experience luxury-car silence in your vehicle?
If you are located in Southern California, visit Sorena Car Audio in Irvine, CA. Our team specializes in custom vehicle acoustics, premium audio integration, and full-cabin soundproofing packages tailored to your exact driving needs.
- Call/Text: (949) 734-0803
- Address: 17975 Skypark Cir, Suite A, Irvine, CA 92614
- Website: sorenacaraudio.com
Contact our specialists today to receive a personalized soundproofing estimate for your car!
Unlocking True Audio Fidelity
For those interested in car audio services, sound deadening is non-negotiable. Before you spend hundreds or thousands on high-end speakers, amplifiers, and subwoofers, you need to treat the environment they play in.
When your music plays, the vibrations from your speakers shake the thin metal of your doors. This causes two problems:
- Cancellation: The back-wave of the speaker cancels out the front-wave, destroying mid-bass response.
- Rattles: Loose wiring, plastic clips, and panels vibrate, adding unwanted noise that muddies the sound.
Applying sound deadening mats inside the doors and sealing access holes transforms the door panel into a sealed, non-resonant speaker enclosure. The result? Cleaner, tighter mid-bass, significantly improved volume potential, and a sound stage free of distracting rattles. It makes even mid-range speakers sound exponentially better.
The Essential Car Sound Deadening Materials (What Works Best)
To achieve true quiet and acoustic excellence, you need a layered approach. No single product can solve every noise problem. The best strategy involves using specific sound deadening materials for damping, blocking, and decoupling.
1. CLD Tiles (Constrained Layer Dampers)
CLD is the foundation of any sound deadening project. It’s typically a peel-and-stick mat made of visco-elastic butyl rubber backed by a thin aluminum foil layer.
- Function: Damping (converts vibration into heat).
- Application: Applied directly to bare, clean metal surfaces (doors, roof, trunk floor).
- Key Technique: You only need 25% to 60% coverage of a panel to dramatically reduce vibration. Covering 100% provides diminishing returns and only adds unnecessary weight. The material must be rolled firmly onto the metal for maximum adhesion and effectiveness.
2. MLV (Mass Loaded Vinyl)
If CLD stops the metal from resonating, MLV is the heavyweight champion that blocks airborne noise. MLV is heavy, flexible vinyl sheeting and is arguably the most critical component for serious car noise reduction.
- Function: Blocking (reflects airborne noise).
- Application: Used as a second layer over CLD and is installed on the floor, firewall, and trunk carpet-side. It must be installed with 100% coverage and cannot touch the metal—it needs a small air gap or decoupling layer beneath it.
- Science: Sound blocking requires mass. MLV uses its density to create a dense barrier that sound waves simply cannot penetrate.
3. Closed-Cell Foam (CCF) and Decoupling Layers
CCF is a thin, lightweight foam used as an intermediate layer in a multi-layer system.
- Function: Decoupling and Absorbing. It provides the crucial air gap between the CLD and the MLV. It also acts as light acoustic absorption to clean up high-frequency echo.
- Application: Often used in doors to separate the interior panel from the CLD, preventing rattles. It’s also applied to trim panels and plastics to prevent them from vibrating against the sheet metal.
4. Undercoatings and Spray-On Solutions
For hard-to-reach areas like the wheel wells, liquid or spray-on deadeners can be effective. These are often rubberized asphalt or water-based viscoelastic polymer coatings.
- Function: Damping/Protecting. They work by adding mass and damping vibrations in areas where adhesive mats are difficult to apply.
- Application: Exterior wheel wells, underside chassis, and tight corners of the trunk.
Expert Sound Deadening Techniques: Where and How to Apply
The effectiveness of car sound deadening is often less about the material and more about the technique and placement. Targeted application is essential for maximizing your investment.
The Doors: The Audio Sweet Spot
The doors are often the first place targeted due to ease of access and their direct impact on audio quality.
- Outer Skin Damping: Apply 50% CLD coverage to the large, flat outer metal panel inside the door cavity. This stops the metal from vibrating when the speakers play or when road debris hits.
- Inner Skin Sealing: Apply 100% CLD coverage to the inner metal panel (where the window motor is attached) to seal all factory holes. This creates a proper acoustic seal, acting like the front baffle of a speaker cabinet.
- Panel Decoupling: Use small strips of CCF or specialized foam between the plastic door panel and the metal frame to eliminate buzzes and rattles.
The Floor and Trunk: Tackling Road Noise
The floor is the primary source of tire hum, exhaust drone, and general road noise solution. This area requires the most intensive, layered approach.
- Firewall: This separates the cabin from the engine bay. It needs CLD for vibration damping and then a heavy layer of MLV for blocking engine noise.
- Main Floor Pan: Apply CLD tiles to major flat sections of the bare metal. Then, lay 100% coverage of MLV over the entire floor area, ensuring edges are sealed. This is the single biggest step for car noise reduction.
- Trunk: Treat the trunk floor and the inside of the trunk lid with CLD. If road noise is still intrusive, a layer of MLV over the trunk floor can dramatically quiet the rear of the car, especially in hatchbacks and SUVs.
The Roof and Hood: Vibration and Engine Noise
These areas often get overlooked, but they are crucial for a complete solution.
- The Roof: The thin metal roof is a major source of wind and rain noise. After dropping the headliner, apply 50%-70% CLD coverage to the bare metal. This quiets rain pings into a gentle tap.
- The Hood: Use a specialized heat-resistant damping pad or layer on the underside of the hood to reduce engine noise transmitted through the firewall and cabin, while also offering thermal protection. (Understanding Noise, Vibration, and Harshness (NVH))
The Layered Sound Deadening Strategy
Title: The Three Layers of a Silent Cabin: Damping, Decoupling, and Blocking
Priority Areas: Floor, Firewall, Doors.
- Layer 1 (CLD Mat): Directly applied to metal chassis. Goal: Stops vibration. Coverage: 25-60%.
- Layer 2 (CCF): Thin foam layer placed directly on top of the CLD. Goal: Decouples MLV from metal, absorbs high-frequency sound. Coverage: 100% required under MLV.
- Layer 3 (MLV): Thick, heavy barrier layer placed on top of CCF. Goal: Blocks airborne noise (road, wind, engine). Coverage: 100%.
Pro Tip: Always seal material tightly with a roller to ensure maximum damping effectiveness. Noise reduction can exceed 15 dB.
Decoding the Cost of Professional Sound Deadening Installation
While DIY installation of car sound deadening is possible, it is incredibly labor-intensive. It requires safely dismantling significant parts of the car’s interior—panels, seats, carpet, and headliner—and ensuring proper reassembly without triggering airbags or damaging electrical systems.
For the target audience—those seeking premium results and peace of mind—professional installation is the preferred route. But what drives the professional sound deadening cost?
What Influences the Professional Sound Deadening Cost?
The total investment for a professionally deadened vehicle typically falls into two categories: high-quality materials and expert labor.
- Scope of Coverage (The “Treatment”):
- Partial Treatment (Doors & Trunk): Best for audio quality only. Estimate: $700 – $1,200.
- Full Road Noise Treatment (Floor, Doors, Trunk, Firewall): This targets the loudest noises and provides the best road noise solution. Estimate: $1,200 – $2,500.
- Full Vehicle (Including Roof, Hood, Wheel Wells): The “Lexus quiet” package. Estimate: $2,500 – $4,000+.
- Vehicle Size and Complexity: A two-door coupe requires less material and labor than a large SUV, truck, or van. A full-size SUV can require twice the materials and labor hours of a small sedan. Luxury or performance vehicles with complex wiring or fragile interior clips will incur higher labor rates.
- Material Quality: Premium materials use higher-density butyl rubber, thicker foil layers, and purpose-built MLV (often with integrated foam decouplers). These cost more but deliver superior acoustic performance and heat resistance compared to cheaper, asphalt-based alternatives. A high-quality bulk material kit for a full vehicle can cost upwards of $500-$1,000 alone.
- Labor Rates: Professional installers charge based on the hours required for safe disassembly, surface prep (cleaning and degreasing), precise material cutting and application, and flawless reassembly. Labor alone often accounts for $400 to $1,500 of the total price, depending on the scope.
Comparing DIY vs. Professional Installation
| Factor | DIY Installation | Professional Installation |
|---|---|---|
| Material Cost | $200 – $600 | Included in package; often high-end, warrantied products. |
| Labor Cost | Free (Your Time) | $400 – $1,500+ (Expert installation) |
| Time Required | 20 – 60+ Hours | 1 – 3 Days (Vehicle drop-off) |
| Skill Needed | Moderate to High (Tricky reassembly/wiring) | Expert (Guaranteed results) |
| Result Quality | Highly variable; success depends on technique. | Consistent, maximum car noise reduction and warranty protection. |
For many, investing in professional installation is the superior choice, as it guarantees the use of correct sound deadening techniques and materials for a permanent, high-performance car sound deadening solution. It’s an investment in comfort, audio fidelity, and the long-term enjoyment of your vehicle.
Frequently Asked Questions (FAQ)
Does sound deadening add a significant amount of weight to my car?
Good question, and it’s a common concern, especially for performance enthusiasts. High-quality CLD, used sparingly at 25% coverage, adds minimal weight relative to the car’s mass (often less than 50 pounds total). However, using MLV for full-floor coverage can add considerable mass (e.g., 50-80 pounds). A professional installer will use the minimal amount of material necessary to achieve the desired result, prioritizing lightweight solutions like thin, high-performance butyl and specialized foams to minimize weight gain while maximizing effect.
How long does car sound deadening material last?
When applied correctly to a clean, bare metal surface, high-quality butyl-based sound deadening materials are designed to last the entire lifespan of the vehicle. They are resistant to extreme automotive temperatures, moisture, and vibration. Professional installation ensures proper adhesion and sealing, preventing material failure, melting, or off-gassing, which can occur with low-quality, asphalt-based products.
Can sound deadening fix rattles and buzzes from my door panels?
Absolutely. In fact, this is one of the quickest and most satisfying wins of car sound deadening. A significant amount of cabin noise is actually rattles and buzzes caused by plastic trim vibrating against metal. The second layer of material (CCF) is specifically used as a “decoupler.” By applying small strips or patches of this material to the back of the plastic panels, you create a buffer that isolates the plastic, permanently eliminating those irritating noises and dramatically improving the clarity of your stereo. You can see how we integrate door speaker upgrades here.
What is the difference between Damping and Soundproofing (Blocking)?
This is a core concept:
- Damping: This addresses structural noise. It stops metal panels from vibrating like drums. Damping materials (CLD mats) work when applied to just a fraction of the panel’s surface area.
- Soundproofing/Blocking: This addresses airborne noise (road, engine, wind). It requires a heavy barrier, like Mass Loaded Vinyl (MLV), which must cover 100% of the surface area (floor, firewall) to effectively reflect the sound waves away from the cabin. It’s a two-stage process: Damping first, Blocking second.
Conclusion
The pursuit of a quiet vehicle is not a luxury—it’s a fundamental upgrade to your daily life. Whether your goal is a serene commuting experience through powerful car noise reduction or achieving crystal-clear sound fidelity from your audio system, proper car sound deadening is the ultimate foundation.
By understanding the key sound deadening materials—CLD for damping, MLV for blocking, and CCF for decoupling—and applying them using proven sound deadening techniques to high-priority areas, you can transform your vehicle from a noisy environment into a premium, tranquil space.
While DIY is an option, the complexity of disassembly, the need for 100% coverage with MLV, and the desire for guaranteed results often make the professional sound deadening cost a worthwhile investment for car audio enthusiasts.
Ready to transform your daily commute into a serene experience? Contact our certified installation experts today for a personalized quote on your complete car sound deadening package!

We offer all car audio services
List of Services:
- DashCam
- Ambient Lighting
- Starlight
- Windows Tinting
- Armoring & Ballistic Protection
- Apple CarPlay
- Dash Upgrade
- Android Auto
- Paint Protection Film (PPF)
- Sound Deadening – Sound Proofing
- Front and Rear Parking Sensors
- Blind Spot Radars
- Car Ceramic Coating
- HD Backup Camera
- Mirror Monitor
- Subwoofer Integration
- Classic Car Audio
- Wheel Well Sound Deadening
- Marine Audio System
- Marin Audio
- Flipdown Monitor
- Bluetooth Integration
- Rear Entertainment System
- Steering Wheel Upgrade
- Car Wrapping
- Interior Suede Alcantara Wrap
- Alcantara Suede Headliner
- ECU Tuning
- Center Console Safe Installation
Leave A Comment