Ever gazed up at a Rolls-Royce ceiling and wished you could bring that breathtaking, star-filled night sky into your own car? That luxurious feature, known as a starlight headliner, is more accessible than you might think. Whether you’re aiming for a touch of elegance, a unique customization, or simply a more serene driving experience, installing a starlight headliner can dramatically transform your vehicle’s interior.
But where do you even begin? The prospect of costs, choosing the right kit, and the installation process can seem daunting. This guide is here to illuminate the path. We’ll break down everything you need to know, from the price of a professional installation to a step-by-step walkthrough for a rewarding DIY project. Prepare to turn your daily drive into a celestial journey.
Key Takeaways at a Glance
| Aspect | Professional Installation | DIY Installation |
| Average Cost | $700 – $2,500+ | $150 – $400 (Kit Cost) |
| Time Required | 1-3 days | 8-20 hours (weekend project) |
| Pros | Flawless finish, warranty, no personal labor | Cost-effective, rewarding experience, customizable |
| Cons | Higher cost, vehicle downtime | Time-consuming, potential for mistakes, requires patience |
| Best For | Owners of luxury vehicles, those seeking perfection | Enthusiasts on a budget, hands-on individuals |
What is a Starlight Headliner and How Does it Work?
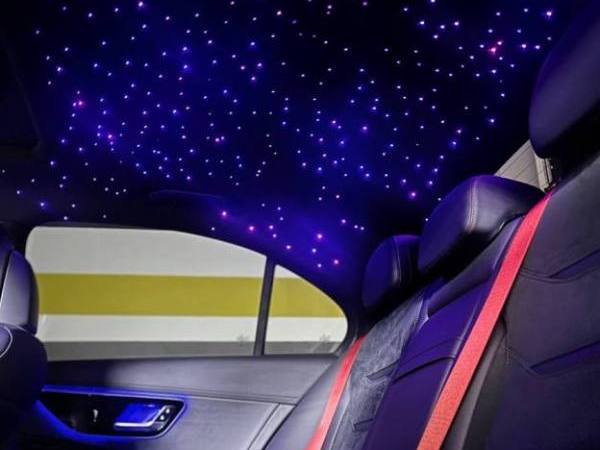
At its core, a starlight headliner is a custom interior modification that uses fiber optic technology to replicate the appearance of a starry night sky on the ceiling of your vehicle. It’s not a screen or a projection; it’s a physical installation of hundreds of individual points of light.
Here’s the simple breakdown of how it works:
- LED Light Engine: This is the heart of the system. It’s a small box that generates and houses the light source, typically powerful RGBW (Red, Green, Blue, White) LEDs. This engine is usually hidden in the trunk, under a seat, or behind the C-pillar trim.
- Fiber Optic Strands: A bundle of hair-thin, flexible fiber optic cables plugs into the light engine. These strands don’t carry electricity, only light.
- Installation: Each fiber optic strand is painstakingly threaded through a tiny hole made in your car’s headliner. The strands are then secured on the backside of the headliner board with adhesive.
- The Effect: When the light engine is turned on, it shoots light through the entire bundle of fiber optic strands. This light travels the length of each strand and emerges at the very tip, creating a single, bright “star” on your ceiling. By using hundreds of strands of varying lengths and diameters, you can create a dense, multi-dimensional, and realistic celestial effect.
Modern kits often come with a remote control or a smartphone app, allowing you to change the colors, adjust brightness, and even activate a “twinkle” or “shooting star” effect for a truly dynamic display.

Decoding the Costs: Professional vs. DIY Installation
One of the first questions on anyone’s mind is: “How much is this going to cost?” The answer depends heavily on whether you pay a professional or tackle the project yourself.
The Cost of Professional Starlight Headliner Installation
For a pristine, worry-free result, nothing beats a professional installation. Expect the cost to range from $700 to $2,500, and sometimes even higher. Several factors influence this price:
- Vehicle Size: A larger SUV or truck with more surface area will require more stars and more labor than a small coupe, thus increasing the cost.
- Number of Stars: The density of the starfield is a major price factor. A standard 450-600 star setup will be significantly cheaper than a lavish 1,200+ star constellation.
- Kit Features: Adding advanced features like a twinkle motor, shooting star effects, or high-power light engines will increase the price of both the materials and the labor.
- Headliner Material: If you decide to upgrade your headliner fabric to something premium like Alcantara or suede at the same time, this will be an additional cost.
- Labor Rates: The hourly rate of the custom auto shop will vary by location and reputation.
While it’s a significant investment, paying a professional ensures the job is done right, often comes with a warranty, and saves you from a very time-intensive and meticulous project.
The Cost of a DIY Starlight Headliner Kit
If you’re hands-on and looking for a more budget-friendly option, the DIY route is incredibly rewarding. The primary cost is the starlight headliner kit itself, which typically ranges from $150 to $400.
When choosing a starlight headliner kit, consider the following:
- Star Count: Kits are sold by the number of fiber optic strands included (e.g., 500pc, 800pc, 1000pc). Measure your headliner and consider how dense you want the effect to be.
- Light Engine Wattage: A higher wattage (e.g., 16W vs 20W) generally means brighter stars.
- Features: Do you want a simple static color display, or do you want RGBW color-changing, a twinkle effect, and music synchronization? Twinkle and shooting star kits have separate, small motors in the light engine to create the effect and cost a bit more.
- Controls: Most kits come with a simple remote, but many now offer more convenient Bluetooth app control.
- Fiber Length: Ensure the fiber optic strands are long enough to reach from your planned light engine location to the furthest point of your headliner. It’s always better to have extra length. For larger vehicles like trucks and SUVs, look for kits with longer strands (e.g., 10-13 feet).
The DIY Challenge: A Step-by-Step Starlight Headliner Installation Guide
Ready to create your own cosmos? This is a project that requires patience, not necessarily advanced skill. Set aside a full weekend for the task.
Step 1: Gather Your Tools and Kit
Before you start, make sure you have everything you need:
- Your chosen starlight headliner kit
- Interior trim removal tool kit
- Screwdrivers and a socket set
- A permanent marker or chalk
- Small drill bits or sharp T-pins/needles
- Hot glue gun and plenty of glue sticks
- Flush cutters or sharp scissors
- Fuse tap and extra wiring (for hardwiring)
Step 2: Carefully Remove the Headliner
This is often the most intimidating part. You’ll need to systematically remove any components attached to the headliner.
- Disconnect the battery to be safe.
- Remove A, B, and C-pillar trim panels.
- Unscrew sun visors, grab handles, and overhead console/dome lights (unplugging any wiring).
- Once everything is detached, the headliner board will be held in by just a few clips. Gently pop it loose.
- Now, the puzzle: carefully maneuver the headliner board out of the vehicle. This is much easier with a second person. In sedans, you often have to recline the front seats all the way back and carefully angle it out through a front door.
Step 3: Plot Your Universe
With the headliner out and placed on a clean surface (fabric side up), it’s time to design your star pattern.
- For a natural look, avoid perfect geometric patterns. Randomly place dots using your marker.
- Create denser clusters and sparser areas. You can even try to replicate real constellations!
- A good tip is to divide the headliner into a grid and aim for a certain number of stars per grid square to ensure even, yet random, distribution.
Step 4: Poking the Holes
Flip the headliner over so you’re working on the backside.
- Using a sharp pin, needle, or a very small drill bit, poke a hole through each mark you made. Be precise and push straight through. A sharp tool is crucial to avoid snagging or damaging the headliner fabric.
Step 5: Threading the Fibers
This is the most time-consuming step.
- Start from one side and begin pushing a single fiber optic strand through each hole from the back.
- Push a few inches of fiber through the front side. Don’t worry about making them even yet.
- After threading a small section (20-30 fibers), apply a small dab of hot glue to the base of each strand on the backside of the headliner to secure it. Do not use super glue, as it can make the fibers brittle.
- Keep the bundle of fibers on the backside as untangled as possible. Work methodically across the entire headliner until every hole has a fiber.
Step 6: Wiring and Reinstallation
Before putting the headliner back in, you need to plan your power source.
- Cigarette Lighter: The easiest method is to use the 12V adapter included with most kits. You’ll just need to route the wire neatly.
- Hardwiring (Recommended): For a clean, professional look, use a fuse tap to connect the light engine to a circuit in your fuse box that turns on with the car (like the radio or interior lights). This hides all the wires.
- Gather the loose ends of the fiber optics into a single bundle and plug them into the light engine. Secure the light engine in your chosen location.
- With a helper, carefully guide the headliner back into the car, ensuring you don’t snag or break the fibers. Reinstall all the trim pieces, lights, and handles in the reverse order you removed them.
Step 7: The Final Trim
You now have hundreds of fibers hanging from your ceiling.
- Using a pair of flush cutters or a sharp craft knife, trim the end of each fiber optic strand so it is perfectly flush with the headliner fabric.
- Turn on your new starlight headliner and admire your work!
For a more detailed walkthrough, consider checking out one of the many excellent video tutorials available online. For a great external resource on the DIY process, Instructables has a detailed user-submitted guide.
Is a Starlight Headliner Worth It? Weighing the Pros and Cons
This stunning modification isn’t for everyone. Let’s break down the advantages and disadvantages.
Pros:
- Unmatched Aesthetics: It adds a “wow” factor and a level of luxury that is impossible to achieve with other lighting mods.
- Enhanced Ambiance: It creates a relaxing and serene environment inside your car, especially on night drives.
- High Level of Customization: You can choose the color, brightness, and effects to perfectly match your mood or style.
- Potential Increase in Resale Value: If done professionally on a luxury or customized vehicle, it can be an attractive feature for potential buyers.
Cons:
- Cost: It can be a significant expense, especially for a professional installation.
- Time-Consuming DIY: The do-it-yourself route requires a major time commitment and extreme patience.
- Potential for Damage: If installed improperly, you could damage your headliner, trim pieces, or even create electrical issues.
- Driver Distraction: While most systems are dimmable, an overly bright or flashy setting could be distracting while driving. It’s crucial to use it responsibly. You can find more information about vehicle lighting regulations from reputable sources like the U.S. Department of Transportation.
Considering an interior upgrade? Learn about customizing your car’s ambient lighting for another way to enhance your cabin.
Frequently Asked Questions
1. Is having a starlight headliner legal?
Yes, generally. Interior accent lighting is legal in most places as long as it is not visible from the outside in a way that could be confused with emergency vehicle lights (i.e., flashing red and blue). Keep the display a solid color and at a reasonable brightness while driving to avoid any issues or driver distraction. Laws can vary, so it’s always wise to check your local regulations.
2. Will the installation drain my car battery?
No. LED light engines are incredibly energy-efficient and draw a very small amount of power, similar to your interior dome lights. When wired correctly to an accessory circuit, they will only be on when the car is running or in accessory mode, posing no risk to your battery.
3. How long do starlight headliners last?
The fiber optic strands themselves do not degrade. The lifespan of the system is determined by the LED light engine. Most quality LEDs are rated for 30,000-50,000 hours of use, meaning it will likely outlast the vehicle itself. Many reputable kit manufacturers also offer lifetime warranties.
4. Can you install a starlight headliner in a car with a sunroof?
Absolutely! The fiber optics are only installed in the solid areas of the headliner board around the sunroof and on the sunroof shade itself. A professional installer can ensure full functionality is retained. It is a more complex installation, but completely possible.
The Final Frontier
Installing a starlight headliner is more than just a car modification; it’s about creating an experience. It’s about transforming a mundane commute into a peaceful escape under a canopy of stars. Whether you choose to entrust the job to a skilled professional for a flawless finish or embark on the deeply rewarding journey of a DIY project, the result is a truly unique and luxurious touch that makes your vehicle feel like it’s one in a million.
Contact Sorena Car Audio specialists today to schedule a consultation and get a personalized recommendation for your vehicle.

We offer all car audio services
List of Services:
- DashCam
- Ambient Lighting
- Starlight
- Apple CarPlay
- Android Auto
- Paint Protection Film (PPF)
- Sound Deadening – Sound Proofing
- Front and Rear Parking Sensors
- Blind Spot Sensors
- HD Backup Camera
- Mirror Monitor
- Subwoofer Integration
- Classic Car Audio
- Wheel Well Sound Deadening
- Marine Audio System
- Marin Audio
- Flipdown Monitor
- Bluetooth Integration
- Rear Entertainment System
- Windows Tinting
- Steerig Wheel Upgrade
- ECU Tuning
- Car Wrapping
- Dash Upgrade
- Interior Suede Alcantara Wrap
- Alcantara Suede Headliner Installation
- Center Console Safe Installation
Leave A Comment